1. Android System Update
2. Android System Build
3. Android Software Development
1.Android System Update
1.1 Create the SD boot card(SD Card)
- Create the bootloader into SD-card.
Tiny4412 can support that update the system with SD Card, so we should create the Bootloader to the SD card firstly. - Insert a SD-card card into the PC(by SD-card reader).
- run the SD-Flasher.exe tools with administrator privileges, then it will open the dialog that show "Select your Machine", please choose "Mini4412/DevKit4412", and click "Next".
- Click “Relayout” to layout the SD card disk, then click scan, you will see the follow picture(The Avaliable is Yes):
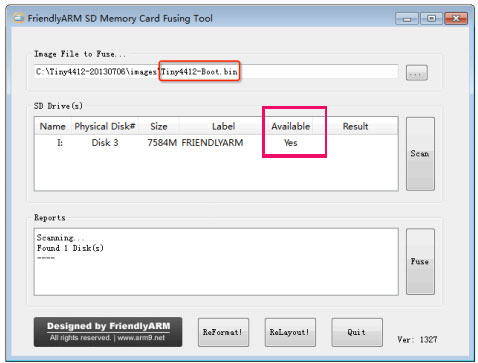
- At the "Image File to Fuse:" item, choose the "Tiny4412-Boot.bin.bin" file.
- Click Fuse, The superboot.bin will be burn into the SD card.
SD-Flasher.exe Position -> CD:/tools/SD-Flasher.exe
superboot.bin Position -> CD:/images
Please confirm that you will the WINdows7 to run the SD-Flasher, the WinDows XP may have some error.
1.2 Prepare the system update file
Copy "images" folder into the SD-card.
"images" position -> CD:/images
If you want to burn the image you build, you can replace the image with the image you build.
In the follow step, We will introduce the method to burn the 7"LCD image to flash。
If you use the others LCD, you can edit the configure file FriendlyARM.ini file (position: SD:/images/FriendlyARM.ini).
Confirm the follow file is in the SD card:
images\Tiny4412-Boot.bin >> bootloaderimages\zImage >> Android kernel
images\ramdisk-u.img >> Android root image
images\system.img >>Android system image
images\FriendlyARM.ini >> configure file
1.3 Android 4.0 system update
Step 1. In PC, open the file "images/FriendlyARM.ini" in TF-card and edit some item as follow:
# FriendlyARM Tiny4412 configurationStep 2. Set the board as SD card boot mode(set S2 for SDBOOT), and insert the SD card to the board.
Step 3. Power on the board, the buzzer will ring one times.
Step 4. The serial will enter the bootloader mode, then it means update the system success.
Step 5. Set the LCD Type, Reboot the Board, and Press the Space button in PC to enter the Bootloader module by the serial port, the serial port will show as follow:Then run the follow command to set the LCD type,
# save
The HD700 means the LCD type, you can set it S70 means the 7”LCD(800*480).
Step 6. Set the board boot from the nand flash, and boot it again. you will enter the android system, for the first boot, it will calibrate the touchscreen.

