The Mini210/Tiny210 Board support two method to update the system, SD card update auto and the USB Device update from PC.
1. SD Card Update
1.1 Created the SD card
Step 1. Burn the bootloader into SD-card.
Tiny210/Mini210s can support that update the system with SD Card(Mini210s use the Micro SD card), so we should create the Bootloader to the SD card firstly.
- Insert a SD-card card into the PC(by SD-card reader).

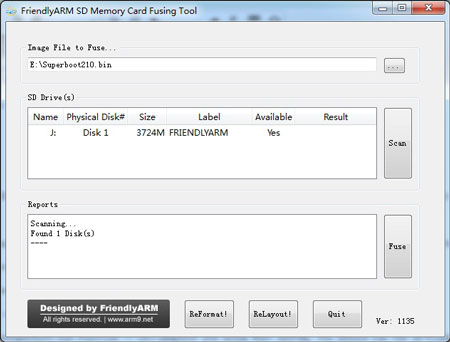
- run the SD-Flasher.exe tools with administrator privileges, then it will open the dialog that show "Select your Machine", please choose "mini210s/Tiny210", and click "Next".
- At the "Image File to Fuse:" item, choose the "superboot.bin" file.(Step 1)
- Click Scan in the tools, The Sd card will be show in the SD Driver item(Confirm the Avialiable is Yes)(Step2)
- Click Fuse, The superboot.bin will be burn into the SD card.(Step 3)
SD-Flasher.exe Position -> CD:/tools/SD-Flasher.exe
superboot.bin Position -> CD:/images
If you using Win7 system, You should run the SD-Flasher.exe as Administator, and click "Scan", "Relayout!" Before doing the above step.
Step 2. Copy the system Image to SD card
Copy "images" folder into the SD-card.
"images" position -> CD:/images
If you want to burn the image you build, you can replace the image with the image you build.
In the follow step, We will introduce the method to burn the 5.6"LCD image to flash, If you use the others LCD, you can edit the configure file FriendlyARM.ini file (FriendlyARM.ini position: SD:/images/FriendlyARM.ini).
2. Android 4.0 system update
Step 1. In PC, open the file "images/FriendlyARM.ini" in TF-card and edit some item as follow:
#This line cannot be removed. by FriendlyARM(www.arm9.net)
CheckOneButton=No
Action = Install
OS = Android

LCD-Mode = No
LCD-Type = H43

LowFormat = No
VerifyNandWrite = No
CheckCRC32=No

StatusType = Beeper | LED

################### Android 4.0.3 ####################
Android-BootLoader = Superboot210.bin
Android-Kernel = Android/zImage
Android-CommandLine = root=/dev/mtdblock4 console=ttySAC0,115200 init=/linuxrc androidboot.console=ttySAC0
Android-RootFs-InstallImage = Android/rootfs_android.img
If you use the Capacitive touch, you should edit the file as follow;
#This line cannot be removed. by FriendlyARM(www.arm9.net)

CheckOneButton=No
Action = Install
OS =Android

LCD-Mode = No
LCD-Type = H43

LowFormat = Yes
VerifyNandWrite = No
CheckCRC32=No

StatusType = Beeper | LED

################### Android 4.0.3 ####################
Android-BootLoader = Superboot210.bin
Android-Kernel = Android/zImage
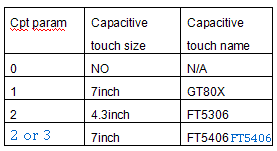
Android-CommandLine = root=/dev/mtdblock4 console=ttySAC0,115200 init=/linuxrc androidboot.console=ttySAC0 skipcali=yes ctp=2
Android-RootFs-InstallImage = Android/rootfs_android.img
For the param ctp=2, it means as follow sheet:

============================================
Step 2. Setting your LCD type by editing the LCD-Type = H43 Line in the FriendlyARM.ini file. The LCD type you can find on the LCD panel, at present, it can support H43, W50, A56, S70, A70, L80, G10.
Step 3. Set the board as SD card boot mode(set S2 for SDBOOT), and insert the SD card to the board.
Step 4. Power on the board, the buzzer will ring one times.
Step 5. Check the board LED and Buzzer, Buzzer will ring a bit of times, then it means update the system success.
Step 6. Set the board boot from the nand flash, and boot it again. you will enter the android system, for the first boot, it will calibrate the touchscreen.\
3. Android 2.3.1 system update
Step 1. In PC, open the file "images/FriendlyARM.ini" in TF-card and edit some item as follow:
#This line cannot be removed. by FriendlyARM(www.arm9.net)
CheckOneButton=No
Action = Install
OS = Android

LCD-Mode = No
LCD-Type = H43

LowFormat = No
VerifyNandWrite = No
CheckCRC32=No

StatusType = Beeper | LED

################### Android 4.0.3 ####################

Android-BootLoader = Superboot210.bin
Android-Kernel = Android2.3.1/zImage
Android-CommandLine = root=/dev/mtdblock4 console=ttySAC0,115200 init=/linuxrc androidboot.console=s3c2410_serial0
Android-RootFs-InstallImage = Android2.3.1/rootfs_android.img
If you use the Capacitive touch, you should edit the file as follow;
#This line cannot be removed. by FriendlyARM(www.arm9.net)

CheckOneButton=No
Action = Install
OS =Android

LCD-Mode = No
LCD-Type = H43

LowFormat = Yes
VerifyNandWrite = No
CheckCRC32=No

StatusType = Beeper | LED

################### Android 4.0.3 ####################
Android-BootLoader = Superboot210.bin
Android-Kernel = Android/zImage
Android-CommandLine = root=/dev/mtdblock4 rootfstype=yaffs2 console=ttySAC0,115200 init=/linuxrc androidboot.console=ttySAC0 skipcali=yes ctp=2
Android-RootFs-InstallImage = Android/rootfs_android.img
For the param ctp=2, it means as follow sheet:

============================================
Step 2. Setting your LCD type by editing the LCD-Type = H43 Line in the FriendlyARM.ini file. The LCD type you can find on the LCD panel, at present, it can support H43, W50, A56, S70, A70, L80, G10.
Step 3. Set the board as SD card boot mode(set S2 for SDBOOT), and insert the SD card to the board.
Step 4. Power on the board, the buzzer will ring one times.
Step 5. Check the board LED and Buzzer, Buzzer will ring a bit of times, then it means update the system success.
Step 6. Set the board boot from the nand flash, and boot it again. you will enter the android system, for the first boot, it will calibrate the touchscreen.
4. Linux system update
Step 1. In PC, open the file "images/FriendlyARM.ini" in TF-card and edit some item as follow:
#This line cannot be removed. by FriendlyARM(www.arm9.net)

CheckOneButton=No
Action = Install
OS = Linux

LCD-Mode = No
LCD-Type = H43

LowFormat = No
VerifyNandWrite = No
CheckCRC32=No

StatusType = Beeper | LED

################### Linux ####################
Linux-BootLoader = Superboot210.bin
Linux-Kernel = Linux/zImage
Linux-CommandLine = root=/dev/mtdblock4 console=ttySAC0,115200 init=/linuxrc
Linux-RootFs-InstallImage = Linux/rootfs_qtopia_qt4.img
Step 2. Setting your LCD type by editing the LCD-Type = H43 Line in the FriendlyARM.ini file. The LCD type you can find on the LCD panel, at present, it can support H43, W50, A56, S70, A70, L80, G10.
Step 3. Set the board as SD card boot mode(set S2 for SDBOOT), and insert the SD card to the board.
Step 4. Power on the board, the buzzer will ring one times.
Step 5. Check the board LED and Buzzer, Buzzer will ring a bit of times, then it means update the system success.
Step 6. Set the board boot from the nand flash, and boot it again. you will enter the android system, for the first boot, it will calibrate the touchscreen.
5. WinCE system update
Step 1. In PC, open the file "images/FriendlyARM.ini" in TF-card and edit some item as follow:
#This line cannot be removed. by FriendlyARM(www.arm9.net)
CheckOneButton=No
Action = Install
OS = CE6

LCD-Mode = No
LCD-Type = S70

LowFormat = Yes
VerifyNandWrite = No
CheckCRC32=No
StatusType = Beeper | LED

################### Windows CE6.0 ####################
WindowsCE6-Bootloader = Superboot210.bin
WindowsCE6-BootLogo = WindowsCE6\bootlogo.bmp
WindowsCE6-InstallImage = WindowsCE6\NK.bin
WindowsCE6-RunImage = WindowsCE6\NK.bin
Step 2. Setting your LCD type by editing the LCD-Type = H43 Line in the FriendlyARM.ini file. The LCD type you can find on the LCD panel, at present, it can support H43, W50, A56, S70, A70, L80, G10.
Step 3. Set the board as SD card boot mode(set S2 for SDBOOT), and insert the SD card to the board.
Step 4. Power on the board, the buzzer will ring one times.
Step 5. Check the board LED and Buzzer, Buzzer will ring a bit of times, then it means update the system success.
Step 6. Set the board boot from the nand flash, and boot it again. you will enter the android system, for the first boot, it will calibrate the touchscreen.
2 MiniTools Update with USB Device
2.1 Prepare the tools
Step 1. Install the "MiniTools-Windows-20130516.exe", the tools was in the CD-A://Tools/MiniTools-Windows-20130516.exe.
Step 2. Burn the bootloader into the SD card as the Chapter 1.1.
Step 3. Copy the FriendlyARM.ini file to the SD:/images folder.
Step 4. Edit the FriendlyARM.ini file of the SD card, add the follow line into the file:
USB -Mode = yes
2.2 Connect the Board to PC
Step 1. Set the Board boot from SDBOOT mode by switch the S2.
Step 2. Power on the board, and the LCD will show "USB Mode: Waiting..."
Step 3. Connect the USB cable from PC to Board USB Device interface.
Step 4. When the connected, the LCD of the board will show "USB Mode: Connected"
2.3 Update the System

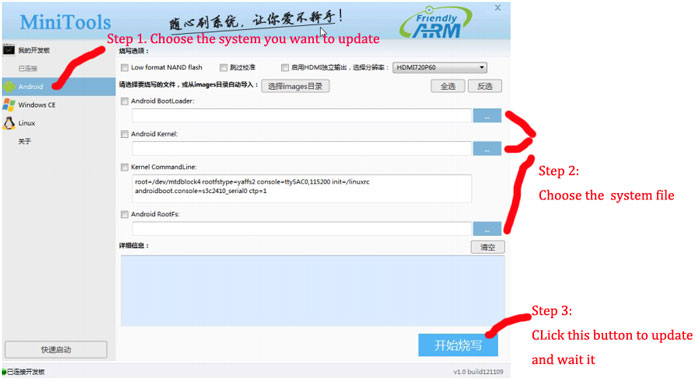
Step 1. Run the Minitools, and choose the system you want to update.
It is a chinese dialog, we will released the english version later, only one button, then it will udpate auto, so don't worry if you don't understand chinese.
Step 2. Choose the system file you want to update.
Step 3. CLick the button to update it and wait it.
After you update, the minitools will print
Installing yaffs2-image...
Installing yaffs2-image succeed
Then you can set the board boot from nand flash, and reboot it.


